Friday, October 29, 2010

Blogger's Quilt Festival

Amy's Creative Side - Blogger's Quilt Festival


I've never done the Blogger's Quilt festival before, so I'm excited to participate!

Looking back on all the things I've made this year, my absolute favorite is the Hey Cherri quilt, which is my version of the Dear Jane quilt.

The finished Hey Cherri Top

The original Dear Jane quilt
I sat down with a friend of mine named Cherri (pronounced Cherry) from the Portland Modern Quilt Guild, and we talked about modern updates to classic quilt patterns, and the subject of Dear Jane came up. It's a quilt I really love, but since I don't really applique or paper piece it seems beyond me. We floated the idea of creating a modern version, and that was all it took.

The result was a month and a half of intense creativity, in which I sketched every block I could think of that fit a 4 x 4 grid. I poured over magazines, flickr groups, and books, and made block after block after block.

I started the project in May, and was leaving town for the summer. I knew I needed to finish the top before then, so I really pushed myself to finish it within a short timeframe.

I really love this project, for a lot of reasons. I never would have started it if Cherri hadn't asked me out to coffee, and I never would have met Cherri if I hadn't joined the Portland Modern Quilt Guild. Joining that group has really added a lot of fun and inspiration to my life.

I'm also so glad that I was able to finish it. I've had a lot of creative pursuits that sort of fizzled out from lack of interest, so I'm so happy to finally find one that I can stick with.

Thursday, October 28, 2010

Using Adobe Illustrator to Design a Quilt: Simple Shapes

Creating shapes in illustrator is both easy and difficult. The more familiar you are with the program, the easier it is, but it can be a bit daunting to start out. Geometric shapes with straight lines are the easiest. 

Keep in mind that there are always several ways to accomplish the same goals in Illustrator. For example, there are a lot of ways to make a square shape, but I'm going to start with the one that takes the least amount of work.

Short Version: 

Select a shape tool, and then drag and click.

Long Version:

In the tool bar palette, select the rectangle tool button. You can either click it once, and get the rectangle tool, or you can click and hold to see all the available options. These are the shapes that illustrator will "premake" for you. 


If you click the right most section, you can "tear off" the palette and move it around your workspace. This is very handy if you are constantly changing the shape you are using, and don't want to keep heading back to the tool bar.
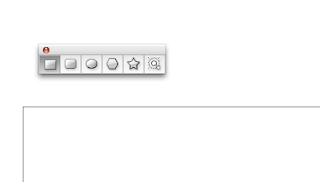
The tear away palette above the art board

From there, all you have to do is click and drag to create your shape.
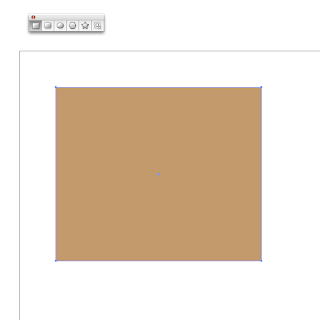
I call it brown square in rhapsody no 7


Alternately, you can  option click, which will pull up the rectangle dialog box. You can do this with any of the shapes in the shapes palette. The star and polygon shapes will have other options besides just width and height. It's not a bad idea to play around with those options to get a feel for what they do. The dialog box allows you to input exact dimensions.
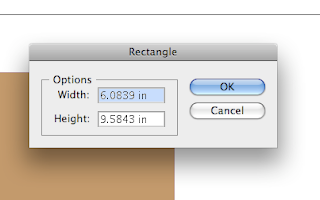
Rectangle Dialog Box


There are some options that control how the shapes are made on the page. They are Snap to Point, and Snap to Grid. Snap to Point is the default setting in Illustrator.


Snap to Point is a system that assigns every object a gravitational orbit, so to speak. When creating new objects, they will snap (or line up) to other objects or guides on the page. This is very apparent when using guides. The whole system is just a way to get things near each other to line up. It's not totally accurate, and there are better tools for it, but it's not a bad starting point.

Additionally, if you hold down the shift key while drawing your shape, you will constrain the proportions. For example, if you hold down the shift key when starting out with the rectangle tool, you'll make a perfect square. If you are resizing a rectangle that already exists, holding down the shift key will enlarge or reduce the rectangle without changing the relative proportion.

Snap to Grid is another feature that will influence how your shapes are formed. I talked in depth about making grids here


When Snap to Grid is selected, your shapes will automatically snap to whatever the nearest grid line is. This is a helpful feature when you know that your shapes will fall exactly into your grid measurements (for example, if you have an one inch grid set up and you know you won't have any half inch pieces). There are ways around this, but I'll get into that later.

Taking all this into account, you should be ready to make some basic shapes!


Wednesday, October 27, 2010

One down, one to go

This past Saturday my friend Jennifer came over, and we went out to dinner.


File photo of Jennifer
While we were hanging out, I had a moment of panic. I thought I hadn't quilted at all that day. It worried me because I was trying to finish a surprise gift quilt for Jennifer, and I needed to get it done before she left her job on the 5th. She works at an Outdoor School site and I want her to get it before the session is over.

I shouldn't have panicked, because I forgot that I had worked on quilt stuff for five hours that day, at the PMQG all day sewing event. It apparently didn't register with me, because it didn't happen at my house. What a weird thing.

I got the quilt for her basted at the sew-in, which was the part of the process holding me up. It's a little bit smaller than twin size, and is just rainbow stripes.

It's a real quilt, not just a bench top! Promise!

I tried a new type of quilting, using a specialty stitch on my machine, and I like the way it turned out. I wish I remember whose blog I read it on, so I could give them credit. I like that it makes a straight stitch a little more interesting, but doesn't take the effort of free motion quilting.


It shows up better on the back. I'm really pleased with how it turned out, and I'm sure I'll use this type of quilting again.

Saturday, October 23, 2010

Decisions, decisions

So, I made these blocks awhile ago, and I really like them. I pulled the colors from my leftover fabrics, so it was nice to get rid of some of that stuff.


While I was making them, I had the idea that I might put them with the scrap project I was working on, but when I put them next to each other I realized that the blocks were not scrappy enough to work with the stuff I had already put together. It wasn't quite a match.


This lead to two realizations.

1. I want to make a quilt with the two blocks I already made, using different color schemes for each one.
2. I wanted to include this block into the scrap quilt, using many colors.

I made three more of the block, and it's interesting to see how different it looks without a coordinating color palette. I wasn't so wild about the overall affect after I finished it, but now that I see it in photos I like it more. I sort of want to make a whole quilt with this type of block too.


Can you see my cat Fritz in the corner? He seems to always know when I want to take a photo of something without him in it, so he makes sure to get in there.

He's been getting a lot of places I don't want him lately, like behind the dish drying rack.

However, his face is so ridiculous that I can't hold it against him.

Saturday, October 16, 2010

Friday Nights

Last night we had an impromptu PMQG sewing night which was tons of fun, as always. We started off with dinner at Tin Shed and (almost) every one humored me for a photo.


Poor Jill got stuck at the side table, but she made it work.


I started working on these blocks during the sewing part of the evening. I had attempted to paper piece some of the parts of it, and decided it wasn't working for me. Thanks to Rachel and Cherri for patiently explaining it to me though! That's the nice part about sewing in a group.

I might add these to the scrap quilt I'm working on. I'll have to layout all the pieces and see how/if it fits together, but I'm hopeful. These blocks are really big, 24" by 24", so they are good for using up larger bits of leftover fabric.

Wednesday, October 13, 2010

Using Adobe Illustrator to Design a Quilt: Using Grids

At the latest PMQG sewing night a few of us met up for dinner at Tin Shed, which is right by Modern Domestic where the sewing night was held. We were talking about quilts (what else!) and the subject came up about the joy of drafting a pattern using graph paper.

I agree, and disagree. I think designing a quilt using a grid is fun, but I find physical graph paper to be too restrictive, and time consuming. I'd much rather use Illustrator where I can customize the grid I want completely, and have things line up exactly.

Navigating the grid in Illustrator is pretty easy, once you know where to look.

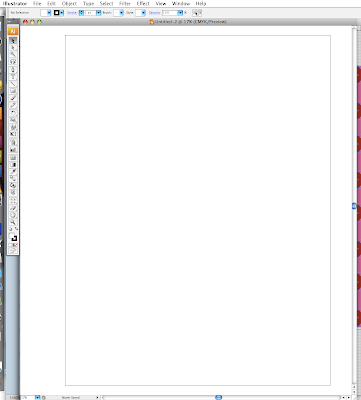
When you first open a document in Illustrator, it will probably look like this, with just a black line demarcating where your art board (live area) is.

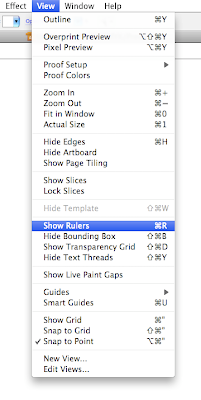
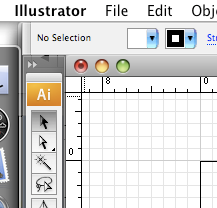
The first thing I usually do it hit cmd-r to bring up the rulers. This can also be found under View: Show Rulers.

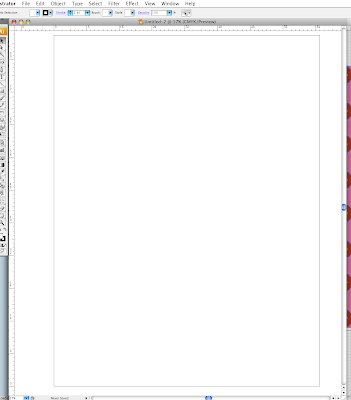
Now your document has nice rulers running along the x and y axes. (I think that's right. The word axes I mean. Plural of axis?)

You can't see it well, but my rulers are set in inches, which is my preferred measurement standard. Sometimes though, it's set to something else. You have a few options. You can control click anywhere in the ruler to bring up a drop down menu and change the unit of measurement (your options are Points, Picas, Inches, Millimeters, Centimeters, and Pixels).


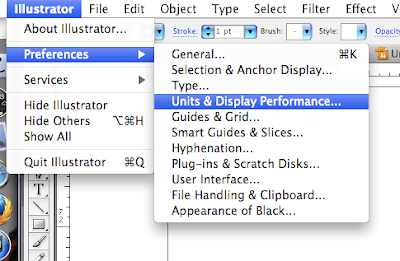
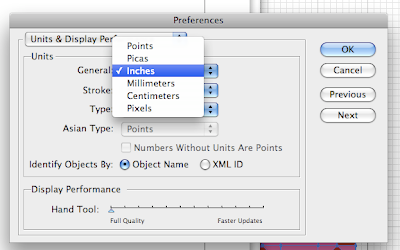
You can also go to Illustrator: Preferences: Units & Display Performance...

Under Units: General you can select Inches, and that will set your rulers to inches. Whatever unit of measurement you choose for the rulers will carry over into any object you create. It's all changeable though, nothing is permanent.

Now that the document has the correct measurement and rulers, all you have to do is go to View: Show Grid.


Instant graph paper! But it's still not quite right for me. I want to make a quilt with 9-inch blocks, and this grid is left over from my last effort, which had 8 inch blocks.


Go to Illustrator: Preferences: Guides & Grid...


This brings up the Guides & Grid dialog box. I want a grid line every 9 inches, with a divider line for every inch, so I have 9 subdivisions. I'm also choosing to have my gridlines behind the objects because such a tiny grid on such a large area seems distracting to me, but it's a matter of preference. You can also change the color of the grid. Cyan is available for a real graph paper look.


The grid is really close now, but I want it to start at the upper left corner of my document, not halfway in the middle.


Do you see the corner where the two rulers meet? It's an empty white box. If you click and drag from that box you can manipulate where the zero point (which means where the rulers start at 0 inches) to the upper left corner of the document. It's not something that I could screen capture, so you'll just have to try it out.


There! Now my grid is perfect, and there is just one last thing.


I'm going to go to View: Snap to Grid. This means any object I create is going to snap to the closest gridline. So if I drew a square that was 4.03 x 4.07, the sides automatically snap to 4 x 4. Now I'm ready to start designing!


Sunday, October 10, 2010

Setting Custom Document Sizes in Adobe Illustrator

I'm holding the world record for laziness today. I've done almost absolutely nothing all day except surf the internet, watch Netflix instant watch, and eat, so I'm going to try and eek out something productive.

In my many wanderings around the internet, I was glancing through the Marimekko fabrics online, and I really liked this print.


I think the overall shapes might make a nice quilt composition, so I pulled up Adobe Illustrator to start laying something out. I realized that I have to type custom dimensions in the New Document dialog box every time I started a quilt, and oh man it's kind of annoying. It takes about 10 seconds to do, but I do it so much I realized I might as well take the time to make some custom document sizes in Illustrator so it could take me about 2 seconds in the future. THIS IS HOW I GET MY THRILLS PEOPLE. I wish I were joking.

It's pretty easy to do.

1. Open Illustrator (I have version CS3), and select New from the file menu.

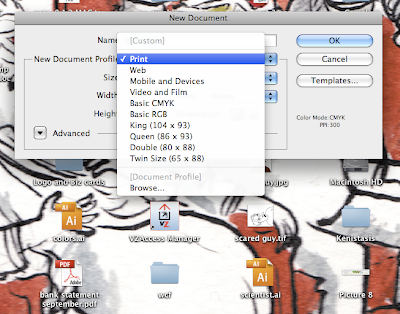
This will activate the New Document dialog box. What I was aiming to do was create a file in the drop down New Document Profile section for all the quilt sizes I might want to make.

As you can see in this screen shot, I've already made profiles for a twin, double, queen and king size quilt. Next up is a crib sized quilt.


2. Create a document to the desired size. Click OK.

In this case, I want a crib sized quilt, at a dimension of 36 by 54 inches.


3. Save your document to the New Document Profiles folder. That folder can be found under Library: Application Support: Adobe: Adobe Illustrator CS3: New Document Profiles.

At least, that's where you save it to on my system. If you don't have a Mac like me, you can find out what folder these things are stored in by selecting Browse... from the New Document profiles drop down menu in the New Document dialog box. That should get you the name and file path of where these things are hiding.


Step 4: Open a new document and select the desired size.

If you've done everything correctly, the next time you open the New Document dialog box you'll see the custom sizes you've created. In this screenshot you can see the background of the reference website I used to determine these sizes. It's pretty handy, and found here.


And here is a quick rendering of a potential quilt (twin sized), inspired by that fabric. Who knows if I'll ever actually make it, and if I do I might change the color scheme completely, but at least I have it visualized, just in case.


Tuesday, October 5, 2010

Jumping Pictures

Some quilters have trouble finding time to make anything for themselves, among all the gifts they make for others. That is not a problem I have! Almost all the quilts I have made go to one place, which is my closet.

They are so much more than just quilts to me. The represent a design process, from the initial idea to the last stitch of the binding. I've spent hours with these quilts, and I feel like no one will love them as much as I do. I can't imagine handing them over to someone else.

That doesn't mean I'm not willing to try. A friend of mine is going through a tough break up at the moment, so I thought maybe it was time to make a quilt for someone else. I knew I wouldn't be able to let go of the quilt if it was a pretty involved one, so I stuck with something simple. I even used prints, which I don't normally do.

It was interesting to go shopping for prints. It took me awhile to find a range rainbow colors that I thought went well together, and if I had it to do over I would pick an orange with a smaller print, but I don't think my friend will mind. The whole thing took less than two hours to iron and piece, so that was a plus.

This past weekend, in addition to the Portland Modern Quilt Guild sewing night, I went to the beach with some friends. It was very spur of the moment, and we had a good time.

When we actually got to the beach, I had assumed it would be like other beach trips that involved walking up and down a stretch of sand. I didn't realize that my friend would be interested in taking a series of "jumping pictures".

Apparently, jumping pictures means jumping the in air and trying to catch a moment when everyone has their feet off the ground. After a lot of false starts, the ladies of the group got one.


The guys were next, and managed to get a lot further off the ground than we did.


The more we did, the more I realized that it's impossible to a) not throw your hands in the air while jumping and b) not look like you are having an awesome time.


We tried to get a group shot of all of us in the air, but it didn't quite work out. I really like this picture though, because everyone has a genuinely happy expression on their face.


All and all, a pretty great weekend.