
At the latest PMQG sewing night a few of us met up for dinner at Tin Shed, which is right by Modern Domestic where the sewing night was held. We were talking about quilts (what else!) and the subject came up about the joy of drafting a pattern using graph paper.
I agree, and disagree. I think designing a quilt using a grid is fun, but I find physical graph paper to be too restrictive, and time consuming. I'd much rather use Illustrator where I can customize the grid I want completely, and have things line up exactly.
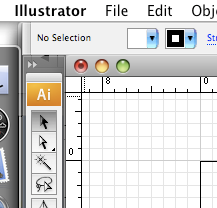
Navigating the grid in Illustrator is pretty easy, once you know where to look.
When you first open a document in Illustrator, it will probably look like this, with just a black line demarcating where your art board (live area) is.
 The first thing I usually do it hit cmd-r to bring up the rulers. This can also be found under View: Show Rulers.
 Now your document has nice rulers running along the x and y axes. (I think that's right. The word axes I mean. Plural of axis?)
 You can't see it well, but my rulers are set in inches, which is my preferred measurement standard. Sometimes though, it's set to something else. You have a few options. You can control click anywhere in the ruler to bring up a drop down menu and change the unit of measurement (your options are Points, Picas, Inches, Millimeters, Centimeters, and Pixels).
You can also go to Illustrator: Preferences: Units & Display Performance...
 Under Units: General you can select Inches, and that will set your rulers to inches. Whatever unit of measurement you choose for the rulers will carry over into any object you create. It's all changeable though, nothing is permanent.
 Now that the document has the correct measurement and rulers, all you have to do is go to View: Show Grid.
Instant graph paper! But it's still not quite right for me. I want to make a quilt with 9-inch blocks, and this grid is left over from my last effort, which had 8 inch blocks.

Go to Illustrator: Preferences: Guides & Grid...

This brings up the Guides & Grid dialog box. I want a grid line every 9 inches, with a divider line for every inch, so I have 9 subdivisions. I'm also choosing to have my gridlines behind the objects because such a tiny grid on such a large area seems distracting to me, but it's a matter of preference. You can also change the color of the grid. Cyan is available for a real graph paper look.

The grid is really close now, but I want it to start at the upper left corner of my document, not halfway in the middle.

Do you see the corner where the two rulers meet? It's an empty white box. If you click and drag from that box you can manipulate where the zero point (which means where the rulers start at 0 inches) to the upper left corner of the document. It's not something that I could screen capture, so you'll just have to try it out.

There! Now my grid is perfect, and there is just one last thing.


I'm going to go to View: Snap to Grid. This means any object I create is going to snap to the closest gridline. So if I drew a square that was 4.03 x 4.07, the sides automatically snap to 4 x 4. Now I'm ready to start designing!


2 comments:
Nice Illustrator tutorial!!
I love Illustrator ~ I use it to design screen printing art for work. I have been using it for my last 2 quilt layouts too.
Just found your tutorial, it was super helpful! I've been searching for a way to design quilts without having to get EQ (I have a Mac). :) Thanks!
Post a Comment